A Raspberry Pi makes an excellent dedicated calendar display. It draws under 5 watts, runs silently, boots directly into a full-screen browser, and requires zero ongoing interaction. Once configured, it sits behind a monitor and does its job indefinitely.
This guide covers the full setup: OS image, network config, Chromium autostart in kiosk mode, screen blanking, and power management. If you have a Pi and a spare monitor, you already have most of what you need.
What You Need
If you have done any Pi projects before, you likely have everything except maybe the HDMI adapter.
| Item | Notes |
|---|---|
| Raspberry Pi (3B+ / 4 / 5) | 1GB RAM is sufficient. A 3B+ works fine — it just takes a few extra seconds to render on initial load. No need for the latest model. |
| MicroSD card (16GB+) | Class 10 or faster. You probably have one in a drawer. |
| Power supply | USB-C for Pi 4/5, micro-USB for Pi 3B+. The official PSU avoids undervoltage warnings, but any quality 5V/3A supply works. |
| Monitor with HDMI input | Use what you have — an old monitor or thrift store find works great. Buying new? Portable USB-C monitors (15-17") are slim, affordable ($50-80), and look clean on a wall. |
| HDMI cable/adapter | Pi 4/5: micro-HDMI to HDMI. Pi 3B+: full-size HDMI. |
| Power timer or smart plug | Optional but recommended. Controls the monitor power on a schedule. See Power Timer section below. |
Setup
Flash the OS
- Download Raspberry Pi Imager on your Mac, Windows, or Linux machine.
- Insert the microSD card into your computer.
- Open Pi Imager and select:
- Device: Your Pi model
- OS: Raspberry Pi OS (64-bit) — the desktop version, not Lite
- Storage: Your microSD card
- Open the settings (gear icon) before writing. Configure:
- Wi-Fi credentials — the Pi connects automatically on first boot
- Hostname:
calendar-kiosk(or your preference) - Username and password
- Write the image and wait for verification.
First Boot and Sign In
- Insert the microSD card into the Pi, connect HDMI to the monitor, and plug in the power.
- Wait for the desktop to appear. First boot takes 2-3 minutes.
- Open Chromium from the taskbar.
- Navigate to
calendar.norfeldt.comand sign in with your Google account. - Configure your calendars — tap the gear icon, choose which calendars to show, pick your colors.
- Go full-screen — press F11 on your keyboard. The calendar fills the entire screen.
That's it — your Pi is now a dedicated family calendar. You can disconnect the keyboard and mouse. The extras below turn it into a true set-and-forget display.
Get More Out of It
Auto-Start the Calendar on Boot
Right now the calendar opens when you launch Chromium manually. This makes it automatic — the Pi boots straight into the calendar, full-screen, no keyboard needed.
Connect a keyboard temporarily (or use SSH if you set it up) and open a terminal. Run:
mkdir -p ~/.config/autostart
cat > ~/.config/autostart/kiosk.desktop <<EOF
[Desktop Entry]
Type=Application
Name=Calendar Kiosk
Exec=chromium-browser --kiosk --noerrdialogs --disable-infobars --no-first-run https://calendar.norfeldt.com
EOF
On next boot, the Pi goes from power-on to calendar — no clicking, no typing.
Stop the Screen From Turning Off
Raspberry Pi OS turns the display off after 10 minutes of inactivity. To disable that:
Open a terminal and run:
sudo raspi-configNavigate to: Display Options → Screen Blanking → No.
Reboot when prompted. The display stays on permanently.
Enable SSH for Remote Management
Want to manage the Pi without plugging in a keyboard? Enable SSH so you can connect from any computer on your Wi-Fi.
The easiest way: re-flash the SD card using Raspberry Pi Imager and check "Enable SSH" in the settings (gear icon) before writing. Or, on the Pi itself:
sudo raspi-configNavigate to: Interface Options → SSH → Enable.
Then from any computer on the same network:
ssh username@calendar-kiosk.localFrom there you can reboot, update the Pi, or change the autostart URL — all without touching it.
The Power Timer Trick
The key to a low-maintenance setup: the Pi runs 24/7 and a power timer controls only the monitor.
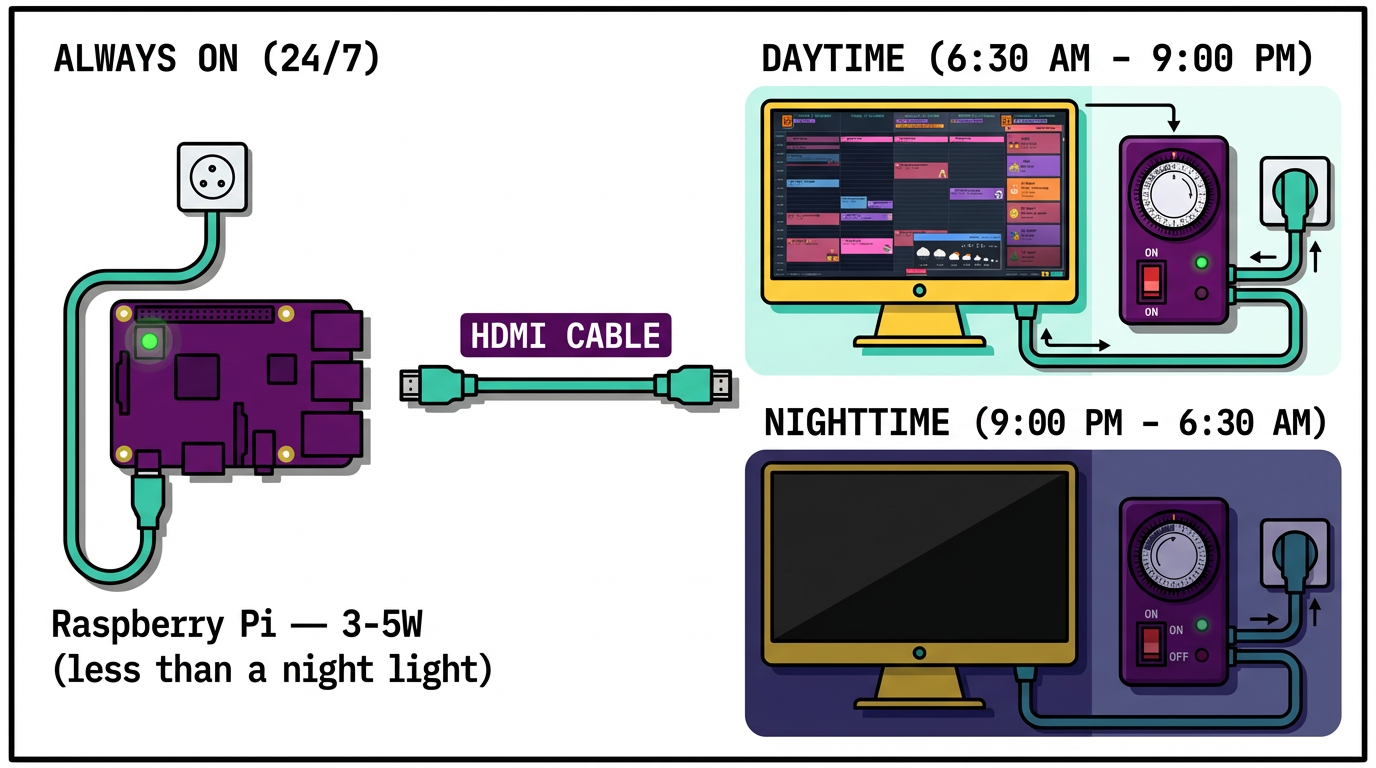
A mechanical timer ($5-8) or smart plug (TP-Link Tapo, IKEA TRETAKT, etc.) on the monitor's power cable. When the timer cuts power to the monitor, the Pi keeps running. When the monitor powers back on in the morning, the calendar is already there — no waiting, no buttons.
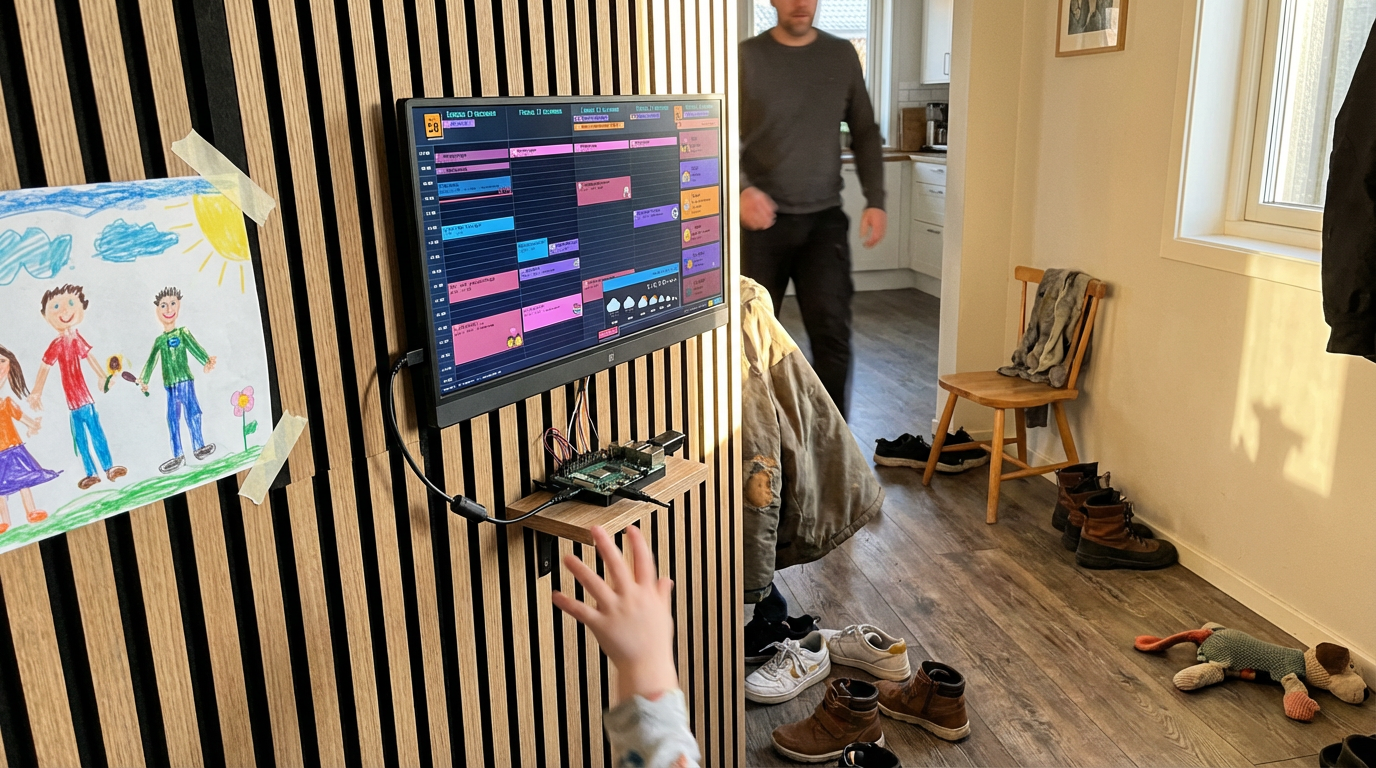
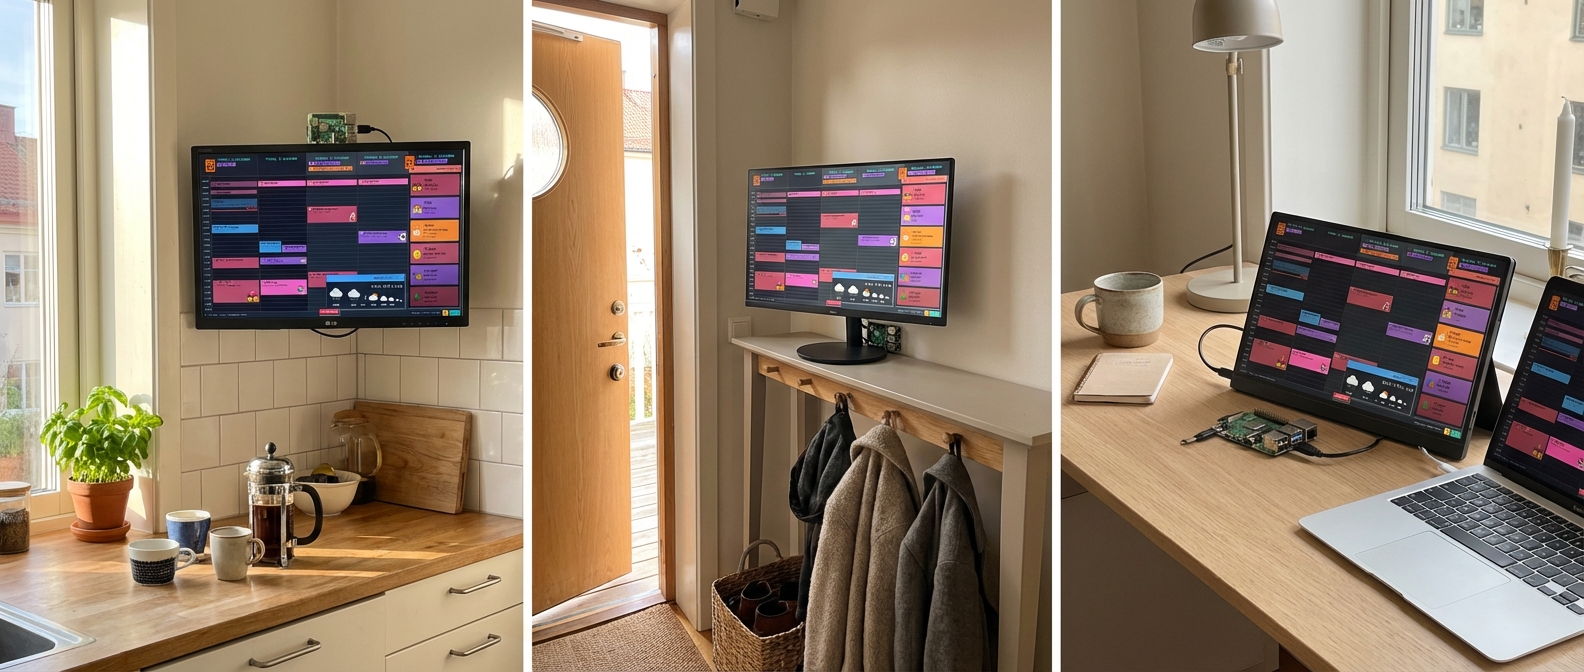
Placement
Location determines whether anyone actually looks at the thing. Place it where your family naturally pauses.
What Runs on the Screen
Family Calendar is built specifically for this kind of display — a 5-day view designed for wall-mounted screens that auto-refreshes and requires no touch input.
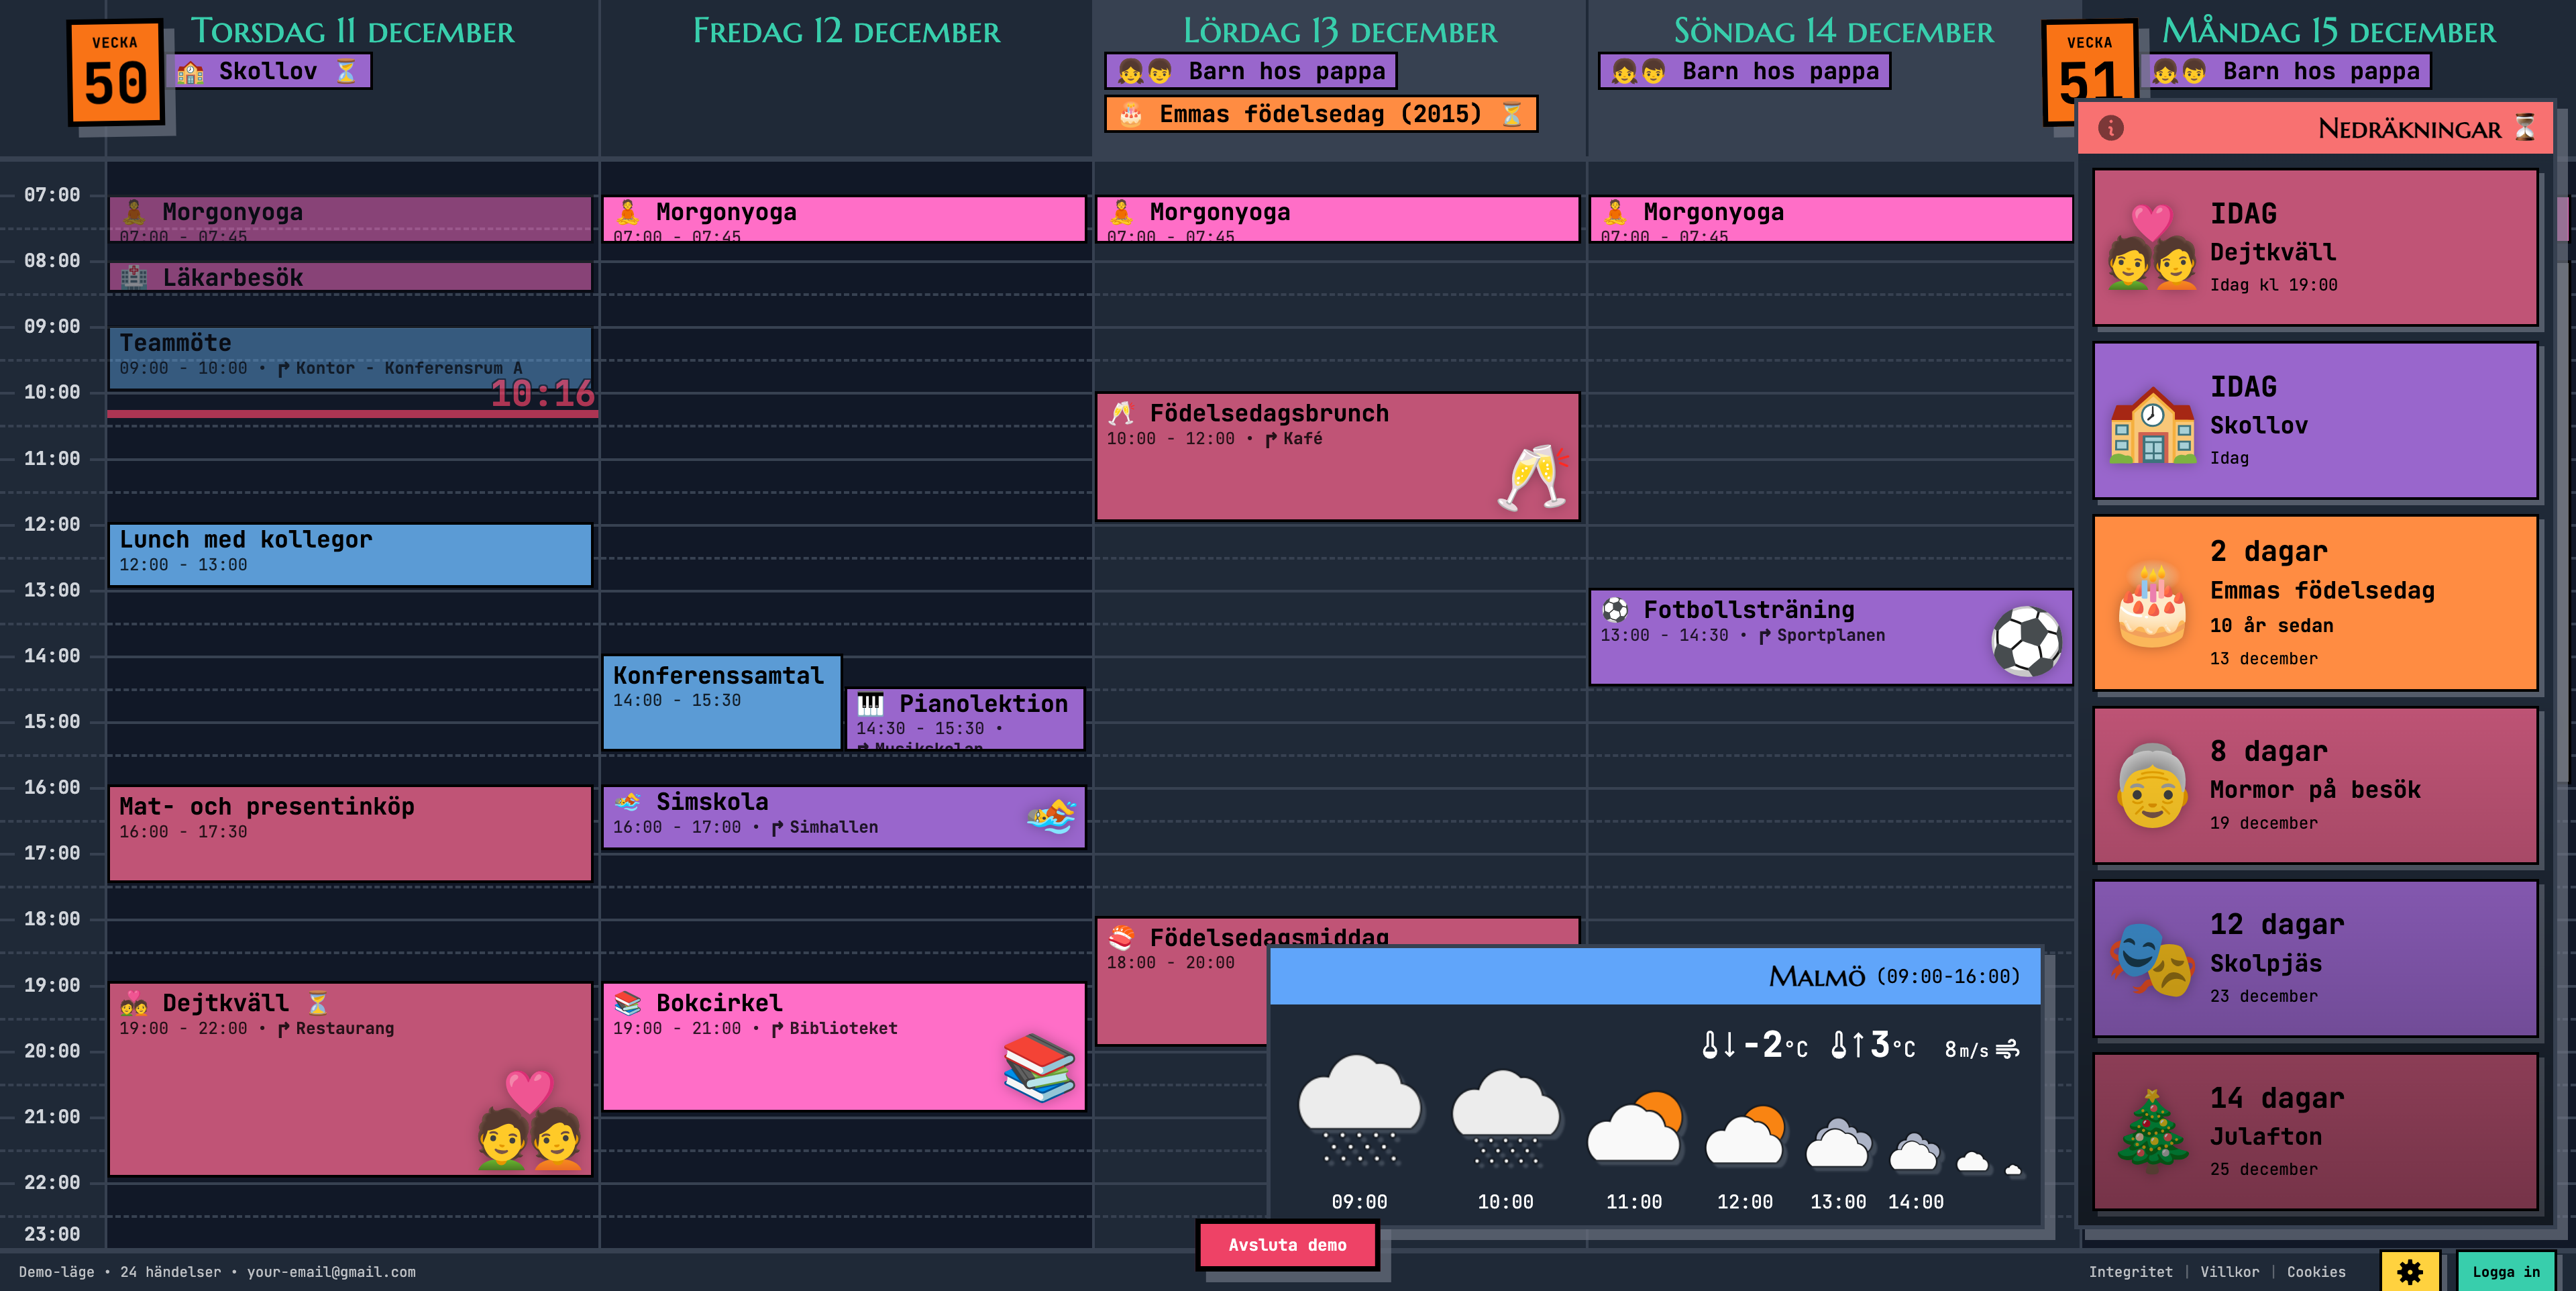
- Emoji events — an event named "Soccer" with a soccer ball emoji renders the emoji prominently, readable from across the room
- Countdown sidebar — events tagged with the hourglass emoji show a live countdown ("3 days until grandma visits")
- Weather forecast — 8-hour local forecast in the corner, configurable location
- 5-minute auto-refresh — add an event on your phone, it appears on the wall
- No interaction required — it stays current on its own
Connect your Google Calendar once, select which calendars to display, and it stays synced. Everyone in the family adds events from their own devices — the kiosk aggregates everything.
Ready to See It in Action?
Head over to calendar.norfeldt.com, connect your Google Calendar, and watch the magic happen.
Great plans — even to just try it out:
Hardware Reference
| Item | Notes |
|---|---|
| Raspberry Pi 3B+ / 4 / 5 | 1GB+ RAM. Use what you have. |
| MicroSD card (16GB+) | Class 10 or faster |
| Power supply (5V/3A) | USB-C (Pi 4/5) or micro-USB (Pi 3B+) |
| Monitor with HDMI | Any size |
| HDMI cable/adapter | Micro-HDMI for Pi 4/5, full HDMI for Pi 3B+ |
| Power timer / smart plug | For the monitor only. Recommended. |
Frequently Asked Questions
Which Pi models work for this?
What about the Pi Zero 2 W?
Does the Pi need ongoing maintenance?
sudo apt update && sudo apt upgrade -y — but it is not strictly necessary.Can I manage it remotely?
ssh username@calendar-kiosk.local. From there you can reboot, update packages, modify the autostart URL, or troubleshoot — all without touching the Pi.What happens when Wi-Fi drops?
Will the screen get burn-in?
Do I need to re-authenticate every 48 hours?
Can I use a different browser?
--kiosk flag (Firefox 71+), but Chromium's flag set is more mature for unattended displays.